Your Cart is Empty
5 min read

Tired of wobbly, messy lines and not entirely having control of the tool?
Or do your movements limit you to a few simple strokes?
Well, don't give up! Through efficient practice, you can sketch smooth and fluid lines and gestures in a matter of few short years. With that in mind, we quickly followed through with our article on how to hold a pencil for drawing.
Through the usage of the new patent-pending arm movement, master that curve with a single magnificent stroke!
The most crucial skill for novice painters to acquire is how to grip and control the pencil correctly.
This may appear to be a simple or even insignificant concern. However, there is a method to it, and how one executes it can significantly impact the outcome.
In this article, I'm going to mention primarily two skills. Thus, without further ado, here's how to hold a pencil for drawing.
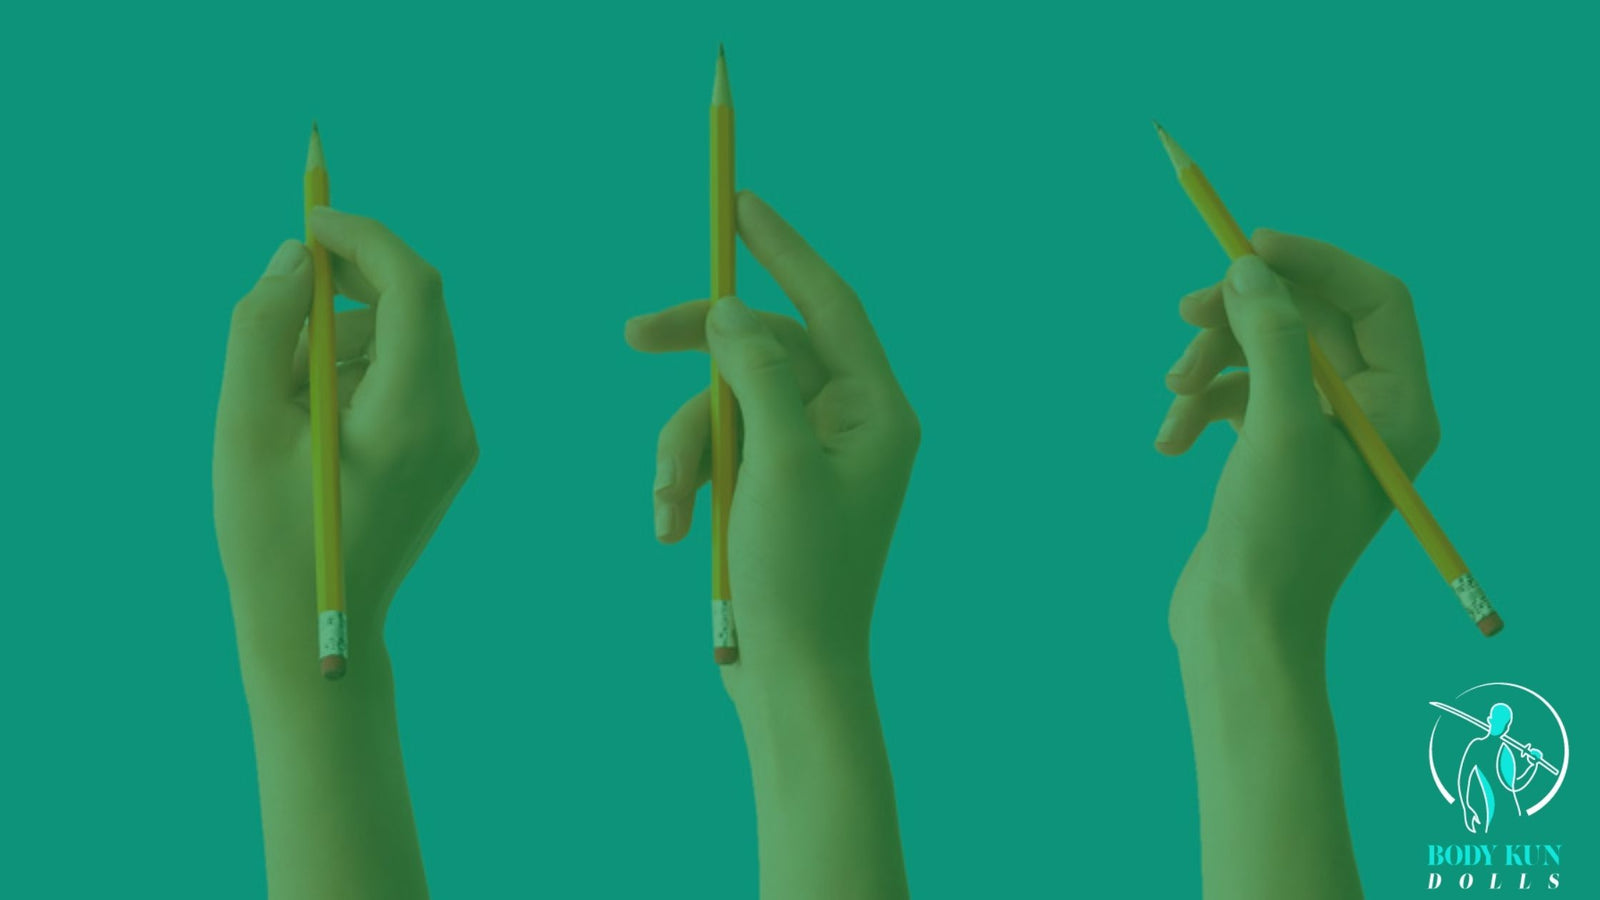
The writing grip and the overhand grip are the two main methods to hold a drawing pencil for drawing.
For the Overhand Grip method, hold the pencil with the points facing upward. It's similar to how I would hold a candle.
The method remains opposed to the writing grip. That's because it only uses the tip of the pencil.
With the Overhand Grip skill, I can use both the side and the tip of the pencil.
Position the pencil using the thumb and forefinger in the Overhand Grip. Hold the pencil with the middle finger to make it tilt at any degree.
As the hand glides over the drawing paper, the ring and pinky fingers can help steady it. It's crucial not to lay the hand too heavily on the drawing paper.
The reason is that it'll prevent it from moving freely.
However, avoid hovering the hands over the paper because that would lead to losing out on a lot of stability. Also, fatigue will take over the shoulders immediately.
For this method, there is also a specific way to sharpen the tip of the pencil. The lead of the pencil should be more exposed to use the side of the lead.
That remains true even for the tip of the pencil for shading.
The most common method is the Writing Grip, which almost all artists use. The reason why it's called the Writing Grip because it's the same hold we use when we write.
It entails manipulating the pencil with the thumb, index, and middle fingers. Since the artist holds the pencil with three fingers, this grip only allows the pencil's tip to descend.
Thus, the grip is also sometimes referred to as a tripod grip.
Also, the artist may alter the level of precision and pressure. That's done by adjusting the position of the pencil when using the writing grip.
The linework would be much more precise if the pencil's held closer to the tip. By holding the pencil towards the end, I can intensify the darkness and pressure on the lines.
If I reduce the level of pressure on my strokes, the outlines will be much softer.
At the same time, there's a risk of losing a certain level of accuracy. But I'll be able to create a more dynamic and softer line as a result.
What differentiates the two grips, and why should I choose one over another?
The Writing Grip is significantly superior for precise drawings and little details in general. That is evident even in the daily penmanship that anybody may indulge in.
Using this grip for sketching, I can produce incredibly delicate and detailed lines. That's especially true when I'm working on delicate features like fine hair and eyes.
The overhand grip is a preferable method to use for enormous fluid expressive lines. That's because I can use the pencil in many different ways and use other pencil areas against the paper.
That way, I'll be able to construct lines that are both dynamic and interesting. Also, I can make thicker strokes using the side of the pencil and thinner strokes with the pencil tip.
By pulling the pencil along the edge, I can also construct sharp lines. Thus, by combining all these techniques, I can have a delightful way to sketch.
Note: The Overhand Grip works considerably better when there's a 20 to 40-degree slope sketching surface.
This positions the sketching paper at a proper angle for the pencil to make contact.
Apparently, according to the husband, I hold my pen weirdly. Please sound off in the poll below to settle this debate. pic.twitter.com/qLDsv1Nb6i
— Ashley Schumacher (@AshWritesBooks) February 18, 2020
On the other hand, I can employ the Writing Grip on a level or sloping surface. So, as a result, it's a little more adaptable in that aspect.
The Overhand Grip is considerably better if I wish to draw a more abstract type of sketch.
In contrast, the writing grip is preferable for a precise and lifelike drawing style.
Also, the medium I use will directly impact the grip I will employ. Say, for instance, I make use of charcoal as the medium.
Charcoal is a rough, scribbled substance. This medium will require an Overhand Grip.
Graphite, on the other hand, is a finer-grained material. So it'll be more comfortable to hold for writing.
Other than the Writing Grip and Overhand Grip, there is another method to hold a drawing pencil. That is, the Candle Grip
Drawing on a board that's positioned vertically is the primary grasp. Next, diagonally place the pencil on the palm and grasp it with the small finger softly but securely.
Hold the pencil with four fingers on the bottom and the thumb on the top.
The forefinger must support the pencil from below. At the same time, the thumb must push the pencil from above.
This method lets me draw with efficient hand movement.
It helps draw both straight and curved lines on a vertical surface. Through that, I can extend my entire arm rather than using just my fingers.
To avoid specific grip mistakes, keep the following in mind:
Holding a pencil with the forefinger pressing from above is not a good idea. The hand movement is significantly restricted as a result of this.
I would personally advise using the forefinger to hold the pencil from underneath. That way, the hand has more range and will be able to move in any direction.
A common blunder is positioning the hand too close to the pencil's tip. Keep it as near to the end as possible.
To get more use out of the pencil, I make use of a pencil extender. That allows me to draw longer lines with lesser hand movement.
Another frequent misstep is holding the pencil firmly with the fingers and just exerting pressure.
Instead, produce markings with only the tiny finger gripping the pencil while the rest of the fingers support its place.
That's it! These are some of the easiest methods on how to hold a pencil for drawing. Now, I would like to know what you think of these methods.
Was I able to carefully analyze all pencil-holding methods?
Comments will be approved before showing up.

3 min read
You're still looking to find the perfect pose to practice your figurre drawing art?
We've collected the best 7 drawing reference sources you can find online free and paid, here we have listed each and everything that you will need in your art journey in this quick guide.

5 min read

5 min read
Do you wish to learn how to draw a female body realistically? If yes, then this article is for you!
This tutorial will provide you with seven easy steps to help you create an impressive realistic female body.